
When I lived in Ireland, I discovered something magical.
My whole American life, I thought that soda bread was some gross concoction of white bread and raisins. I was raised to the unfortunate conclusion that it was yucky and full of “fruit”; only suitable as a doorstop or a second-rate substitution for fruitcake as a holiday gift to relatives you didn’t particularly care for but felt obligated to procure presents for anyway.
But then, I discovered that I was sorely, grossly, wrong. Irish soda bread is a delicious, thick, warm, whole-grain thing. More commonly referred to as “Irish Brown Bread”, it was the staple of every breakfast (…and, for me, lunch, and dinner) when I was abroad. I loved it, and I’m pretty sure that most of my living in Ireland weight was put on due to copious consumption Irish brown bread rather than Guinness.
Upon my return home, I came to several saddening realizations: 1) beer didn’t taste the same anymore; 2) neither did cider; and 3) “soda bread” was still gross, white, and bespeckled with raisins. Where was my hearty brown bread!? What was I going to do but go mad pining for it!?
Almost ten years later, I’ve started baking my own bread and, I realized, if I bake it, I make it. My bread, my rules! There had to be a recipe for Irish brown bread somewhere! TO THE INTERNET!
This was the first recipe to pop up on google (and it was rated five stars by internet denizens at large, a trustworthy bunch en masse even if questionable as individuals). Since the process seemed easy enough, I gave it a whirl. I am SO happy with the results; eating that bread has me right back in Dublin. It’s definitely going to be a staple in this house!
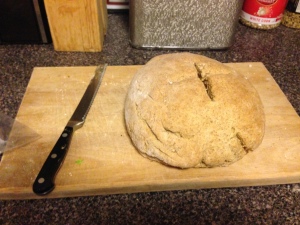
Check out THAT scoring! My happy loaf before it was sliced.
Ingredients
2 1/4 cups whole-wheat flour
1 3/4 cups all-purpose flour
1 1/2 teaspoons baking soda
1 teaspoon fine salt
2 cups well-shaken buttermilk
4 tablespoons unsalted butter (1/2 stick), melted.
Methods
First things first: butter type matters! Irish butter, apparently, has a higher fat content than your run-of-the-mill American butter. Most grocery stores will stock KerryGold at least (and, in fact, that’s what I wound up using). I haven’t tried the recipe with “normal” butter, but I’m told that the results won’t be nearly as spectacular. Long story short: get yourself some Irish butter for this baby!
Pre-heat your oven to 400°F and stick the rack in the middle. This ensures proper heat distribution and allows your bread to bake evenly on all sides.
Sprinkle a baking sheet with flour. You could also line it in a sil-pat mat first to ease clean up. I tend to lay down parchment paper and then flour just to keep myself from having to scrub pans when I’m done baking.
Mix your dry ingredients (flours and baking soda). Use a whisk to combine them in a large bowl. If you’re hard-core, you can sift them together. I don’t have a flour sifter because I (generally) don’t believe in single-use kitchen implements, so I just took a whisk and gave it a good stir around until the mixture was free of lumps and one uniform color.
Add the buttermilk and melted butter. You want to add the buttermilk slowly to ensure that you wind up with the correct texture. I added the first cup along with the butter, mixed everything around a bit with my hands, then slowly added the second cup (I wound up using more like 1.6 cups than 2 cups of buttermilk). You want the dough to be moistened and hold together, but not completely saturated. It might take a bit of mixing around to do. The original recipe recommends mixing at this step with your hands and, truthfully, anything that saves more dishes is fine with me so I went whole-hog bare-handed bread-kneading on this one! Mix everything around until it’s an even consistency (it’ll take about one minute).
Once you’ve done this, turn the dough out (a fancy way of saying “tip it from the bowl”) onto a lightly floured clean work surface. To be completely honest, I tend to use my baking sheet since it’s already floured and I don’t always trust my counter-tops to be clean enough for this task. Knead the dough until you’re left with a smooth ball that has no little pockets of flour. This will take about a minute or so. You want to then create a 2-inch thick flat round about 7 inches in diameter. This bread is dense and thick, so trust me, that’s all you’ll want in a slice. Also: since there’s no yeast in the mixture, the bread will essentially bake in the shape you create now. Make it a good one!
Place your dough mound on your baking sheet if it’s not there already and use a sharp knife to slice an “X” shape on the top. You’ll want this “X” to be about ½ inch deep. This step is called “scoring” the bread and it’s basically a way to help the baker control the final bread shape. As bread cooks, it expands a bit (even non-yeasty bread like this). Think of the shape of a traditional sandwich bread; flat and boxy with the mushroom top. This is due to the “oven spring” process of baking (without getting into the science, basically bread goes “poof” in the oven and expands to up to three times its size pre-baking). As the bread expands, a good score can help you shape the way it does so. The traditional “X” pattern will leave you with a nice round loaf even after it has “sprung” in the oven.
Bake the bread for 35-40 minutes (mine took 35). It’s done when the internal temperature reaches 190°F to 200°F on an instant-read thermometer. Another method to test doneness (the one I used) is to tap on the bread. If it sounds hollow, then it’s done!
Pull the bread from the oven and allow to cool. If you try to slice under-cooked bread, it will fall apart on you. Cooling takes about 2 hours, but I tend to leave mine overnight just to be sure.
Happy baking!