Pretzel!

Finals in full swing and a Nor’Easter raging outside, it can only mean one thing: bake-tastic baking!

I’m a softie for soft pretzels.  When I made these the first time, my ever-wonderful partner in crime asked me where I got them.  When I said “pinterest” he was confused because he was pretty sure that I had bought them from a professional rather than made them myself.  In short: this recipe will not steer you wrong, folks!  Enjoy it with some really good Dijon (I have personally taken to doing a 1 part Grey Poupon to 1 part whole-grain country mustard for optimal deliciousness).

Since these pretzels really only keep for two days or so, I do a half batch from the original recipe.  It means that we can eat them before they lose their doughy goodness.  Here’s my take on Sally’s delicious soft pretzels:

Ingredients

¾ cup warm water
1 packet (1/4 oz) Fleishmann’s active dry yeast; about 2 ¼ tsp
½ tsp kosher salt
½ Tbs light brown sugar
½ Tbs unsalted butter
approx. 2 cups all purpose flour
1 large egg
coarse sea salt to taste

Directions 

Proof your yeast by dissolving it with a tiny pinch of sugar into the warm water.  You want the water to be inside-of-wrist warm (technically 95 to 115 degrees Fahrenheit).  Cover and let stand in a warm dark place for about eight minutes.  If, when you come back, the mixture is bubbly, it means that your yeast is alive and good to go.

Melt your butter in the microwave (you want it just melted, not scorching) and add it to the yeast mixture along with the kosher salt and brown sugar.  Stir this until the mixture is uniform.  Slowly add your flour one half cup at a time until the mixture is thick and no longer sticks to the side of the bowl.  If 2 cups doesn’t do it, add up to 1/8 of a cup more.  If you can poke the dough with a finger and have it bounce back at you, then you know that it’s the correct consistency.

Turn out the dough onto a lightly floured surface and knead it for approximately three minutes.  When you kneed, you’re strengthening the gluten (the long fibers which hold the dough together).  You know that you’re done kneading if the dough is smooth and slightly tacky, and if it holds its shape when held into the air.  When this is done, work the dough into a nice round ball.

Spray a mixing bowl with nonstick spray and place your dough ball in there.  Cover and allow to rise in a warm dark place for ten minutes.

Preheat the oven to 425 degrees and line a prepare a baking sheet.  I like to line mine in parchment paper with a thin coat of nonstick spray for good measure.  If you have a Silpat, you can use that instead.

Cut your dough into three long sections and roll them into long thin ropes.  Slice the ropes into bite-sized sections (I got about 37 from this recipe, but it depends on how big you want your bites!).

Now comes the key part: the baking soda bath.  While this is the most pain in the butt portion of the recipe, it’s also vital to ensure proper pretzel consistency).  Boil about 4 cups of water with ¼ cup of baking soda.  When it has worked up to a good rolling boil, drop in 8 or so bites at a time and allow to boil for 20 seconds.  With a slotted spoon, remove the bites and put them on your baking sheet.  Repeat until you’ve boiled all of your bites.

Beat the egg and brush it over each bite.  Sprinkle the whole shebang with coarse-grained sea salt, and bake for 15 minutes or until golden brown.

I’m told that these bites will freeze for up to three months and that they can be re-thawed in a 300F degree oven.  To be completely honest, the batches I make never last long enough to be a problem.

 Happy baking, and stay safe out there!

Irish Brown Bread

When I lived in Ireland, I discovered something magical.

My whole American life, I thought that soda bread was some gross concoction of white bread and raisins. I was raised to the unfortunate conclusion that it was yucky and full of “fruit”; only suitable as a doorstop or a second-rate substitution for fruitcake as a holiday gift to relatives you didn’t particularly care for but felt obligated to procure presents for anyway.

But then, I discovered that I was sorely, grossly, wrong. Irish soda bread is a delicious, thick, warm, whole-grain thing. More commonly referred to as “Irish Brown Bread”, it was the staple of every breakfast (…and, for me, lunch, and dinner) when I was abroad. I loved it, and I’m pretty sure that most of my living in Ireland weight was put on due to copious consumption Irish brown bread rather than Guinness.

Upon my return home, I came to several saddening realizations: 1) beer didn’t taste the same anymore; 2) neither did cider; and 3) “soda bread” was still gross, white, and bespeckled with raisins. Where was my hearty brown bread!? What was I going to do but go mad pining for it!?

Almost ten years later, I’ve started baking my own bread and, I realized, if I bake it, I make it. My bread, my rules! There had to be a recipe for Irish brown bread somewhere! TO THE INTERNET!

This was the first recipe to pop up on google (and it was rated five stars by internet denizens at large, a trustworthy bunch en masse even if questionable as individuals). Since the process seemed easy enough, I gave it a whirl. I am SO happy with the results; eating that bread has me right back in Dublin. It’s definitely going to be a staple in this house!

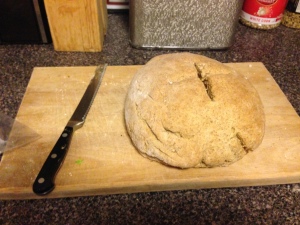
Check out THAT scoring!  My happy loaf before it was sliced.

Check out THAT scoring! My happy loaf before it was sliced.

Ingredients

2 1/4 cups whole-wheat flour
1 3/4 cups all-purpose flour
1 1/2 teaspoons baking soda
1 teaspoon fine salt
2 cups well-shaken buttermilk
4 tablespoons unsalted butter (1/2 stick), melted.

Methods

First things first: butter type matters! Irish butter, apparently, has a higher fat content than your run-of-the-mill American butter. Most grocery stores will stock KerryGold at least (and, in fact, that’s what I wound up using). I haven’t tried the recipe with “normal” butter, but I’m told that the results won’t be nearly as spectacular. Long story short: get yourself some Irish butter for this baby!

Pre-heat your oven to 400°F and stick the rack in the middle. This ensures proper heat distribution and allows your bread to bake evenly on all sides.

Sprinkle a baking sheet with flour. You could also line it in a sil-pat mat first to ease clean up. I tend to lay down parchment paper and then flour just to keep myself from having to scrub pans when I’m done baking.

Mix your dry ingredients (flours and baking soda). Use a whisk to combine them in a large bowl. If you’re hard-core, you can sift them together. I don’t have a flour sifter because I (generally) don’t believe in single-use kitchen implements, so I just took a whisk and gave it a good stir around until the mixture was free of lumps and one uniform color.

Add the buttermilk and melted butter.   You want to add the buttermilk slowly to ensure that you wind up with the correct texture. I added the first cup along with the butter, mixed everything around a bit with my hands, then slowly added the second cup (I wound up using more like 1.6 cups than 2 cups of buttermilk). You want the dough to be moistened and hold together, but not completely saturated. It might take a bit of mixing around to do. The original recipe recommends mixing at this step with your hands and, truthfully, anything that saves more dishes is fine with me so I went whole-hog bare-handed bread-kneading on this one! Mix everything around until it’s an even consistency (it’ll take about one minute).

Once you’ve done this, turn the dough out (a fancy way of saying “tip it from the bowl”) onto a lightly floured clean work surface. To be completely honest, I tend to use my baking sheet since it’s already floured and I don’t always trust my counter-tops to be clean enough for this task. Knead the dough until you’re left with a smooth ball that has no little pockets of flour. This will take about a minute or so. You want to then create a 2-inch thick flat round about 7 inches in diameter. This bread is dense and thick, so trust me, that’s all you’ll want in a slice. Also: since there’s no yeast in the mixture, the bread will essentially bake in the shape you create now. Make it a good one!

Place your dough mound on your baking sheet if it’s not there already and use a sharp knife to slice an “X” shape on the top. You’ll want this “X” to be about ½ inch deep. This step is called “scoring” the bread and it’s basically a way to help the baker control the final bread shape. As bread cooks, it expands a bit (even non-yeasty bread like this). Think of the shape of a traditional sandwich bread; flat and boxy with the mushroom top. This is due to the “oven spring” process of baking (without getting into the science, basically bread goes “poof” in the oven and expands to up to three times its size pre-baking). As the bread expands, a good score can help you shape the way it does so. The traditional “X” pattern will leave you with a nice round loaf even after it has “sprung” in the oven.

Bake the bread for 35-40 minutes (mine took 35). It’s done when the internal temperature reaches 190°F to 200°F on an instant-read thermometer. Another method to test doneness (the one I used) is to tap on the bread. If it sounds hollow, then it’s done!

Pull the bread from the oven and allow to cool. If you try to slice under-cooked bread, it will fall apart on you. Cooling takes about 2 hours, but I tend to leave mine overnight just to be sure.

Happy baking!

Gimme S’More!

In keeping with my theme of stress baking, I made S’mores cookies this week!

As I mentioned, I started baking this semester because I wanted to learn how, but also because some things are just so much awesomer home-made. I’ve been using cookies as a morsel-of-sweet staple to get to know baking techniques, and at this point I have a pretty solid understanding of what goes into crafting a well-made cookie. Here is the recipe I used as the basis for my S’mores cookies.

I actually get a lot of my sweet tooth recipes from Averie Cooks. She knows how to make a good cookie, that’s for sure! I made a half batch of these cookies because I was trying to keep the amount of diet-breaking things in the pantry to a low. Despite the fact that Averie claims her recipe yields 26 cookies, my half-batch made 20! So either she makes HUGE confections, or mine are a bit on the small side for a standard cookie. Either way, the recipe below is how I made them…

INGREDIENTS

3/8 cup (3/4 sticks) unsalted butter, softened
3/8 cup light brown sugar, packed
1/8 cup granulated sugar
1 large egg
1 teaspoon vanilla extract (I actually used vanilla bean paste because I find that it packs more flavor than the extract)
7/8 cup all-purpose flour
1 teaspoons cornstarch
1/2 teaspoon baking soda
pinch salt, optional and to taste
1/2 cup coarsely chopped graham crackers (I used fat free honey flavored graham crackers)
1 cup (half of a bag) semi-sweet chocolate chips (I used the mini chips)
5/8 cups miniature marshmallows

DIRECTIONS:

  • Averie calls for a stand mixer to cream the butter, sugars, egg, and vanilla with, but I don’t have this piece of equipment in my kitchen. Instead, I use an immersion blender on high. I took the first five ingredients of this recipe, mixed them together in a tall measuring cup (actually the one which came with my immersion blender), and blended for about five minutes until the mixture became light and fluffy. I would highly recommend a stand mixer if you have one; my immersion blender requires you to hold the button down for the blender to work (which is actually really annoying for periods longer than a minute or two).
  • I moved my creamed ingredients from their tall measure into a mixing bowl at this point, scraping down the sides of the measure as I went. To them, I added the next four ingredients (flour, cornstarch, baking soda, and pinch of salt), and used a rubber spatula to fold them together until everything was combined.
  • I crumbled the graham crackers by chopping them with my kitchen knife. Because more problems should have “kitchen knife” as a viable solution. I then folded them into the mixture along with the mini chocolate chips and marshmallows until everything looked pretty evenly combined.
  • I have a cookie scoop (it’s a medium scoop) and I love it. I know that my ever-patient boyfriend was strongly adverse to my bringing this single-use kitchen implement into our already-packed kitchen, but trust me; this little baby has more than made up for the space it takes. If you don’t have a cookie scoop, use the old spoon and scrape method to make 2-inch balls of dough. Place dough balls on a plate (I set down parchment paper sprayed with nonstick spray for easy transfer later and covered with plastic wrap to ensure they didn’t get tough in the fridge). You’ll want to refrigerate them for at least two hours if not overnight before baking. Warm dough will spread in the oven while chilled dough gives you fluffy, thick cookies. DO NOT SKIP THIS STEP; trust me. I’m going to be a Doctor.
  • Preheat your oven to 350F. You’ll want to destickify your cookie sheet with spray, a silpat mat, or parchment paper (I tend to double-dip and use parchment sprayed with non-stick). Transfer chilled dough mounds to your baking sheet giving the cookies plenty of space to expand. Averie says you want at least 2 inches per cookie (I bake a bit closer together, but then again… I like to live dangerously). You want to bake the cookies until the tops are just golden brown (it took mine 8 minutes; though I checked them at 7 just in case). The cookies will firm as they cool, so keep that in mind when you’re checking on them. Because of this, you’ll want to you’re your cookies rest on their baking sheets for a bit before transferring them to a cooling rack to finish the cooling process (five minutes or so should do the trick).

I’m told that cookies will last at room temperature for up to one week if stored in an airtight container. Honestly, mine never last that long. You can also freeze them for “up to 3 months”, but I’ve not yet tested this theory.

Hope you’re having a nice week!